Chapters
Deployments
How to Setup True Market Deployments
We use Bitbucket Pipelines here to handle deployments. Follow the steps below to learn how to setup and run pipelines.
- In your Bitbucket account, navigate to the repository you are working on
- Click Repository Settings > Settings > Enable Pipelines
- Go to Repository settings > SSH Keys > Use my own keys
- Add your private and public keys in their respective fields
- Those should be located in your Users/User/.ssh folder on your machine
- If not, see section 1 of this document to learn how to create an SSH key
- Click Save key pair
- Paste
67.205.191.75(the staging server’s IP address) or the server’s IP you want to deploy to in the Known hosts field and click Fetch, then Add host - Go to Pipelines and select Starter Pipeline
- Paste this code in the bitbucket-pipelines.yml editor and click Click Commit file:
Note
If you do not see the Starter Pipeline button, it means a bitbucket.yaml file already exsits. So just click Run initial pipeline and check the configuration. Make sure it looks similar to the code below (swap DOMAIN for the staging site’s actual domain) then select the master branch and the custom: deploy-to-staging pipeline and Run it.
            definitions:
  steps:
    - step: &staging_deploy
        name: Deploy to Staging
        script:
          - pipe: atlassian/rsync-deploy:0.13.0
            variables:
              USER: forge
              SERVER: 67.205.191.75
              REMOTE_PATH: "/home/forge/DOMAIN.truemarket.io/public/wp-content/themes/truemarket"
              LOCAL_PATH: '${BITBUCKET_CLONE_DIR}/'
              REMOTE_HOST: '67.205.191.75'
          - pipe: atlassian/ssh-run:0.4.1
            variables:
              SSH_USER: forge
              SERVER: 67.205.191.75
              COMMAND: |
                cd /home/forge/DOMAIN.truemarket.io/public/wp-content/themes/truemarket
                composer install --no-dev --optimize-autoloader
                npm ci

pipelines:
  branches:
    master:
      - step: *staging_deploy
Now, every time you push changes to the repo, it should automatically update the staging site.
Deploying to Production
When ready to deploy to production, add this code below the existing deploy to staging YAML code. Please note that you will need to fetch the production server’s host (repeat step 6 above) and replace LIVE SERVER IP and DOMAIN with the correct information.
            # Pipeline for production deployment
    deploy-to-production:
    - variables:
        - name: CONFIRM_DEPLOY
          default: "no"
          allowed-values:
            - "yes"
            - "no"
    - step:
        name: "Confirm Deployment"
        script:
          - |
            if [ "$CONFIRM_DEPLOY" != "yes" ]; then
              echo "❌ Deployment cancelled"
              exit 1
            fi
    - step:
        name: Deploy to Production
        script:
          - echo "⚠️ Deploying to production ⚠️"
          - pipe: atlassian/rsync-deploy:0.13.0
            variables:
              USER: forge
              SERVER: LIVE SERVER IP
              REMOTE_PATH: '/home/forge/DOMAIN/wordpress/wp-content/themes/truemarket'
              LOCAL_PATH: '${BITBUCKET_CLONE_DIR}/'
How to Deploy Changes
- Go to the project’s repository and go to Pipelines. If this is the first deployment, click Run initial pipeline, otherwise, click Run Pipeline
- Select the master branch and custom: deploy-to-staging or custom: deploy-to-production if pushing to a production server
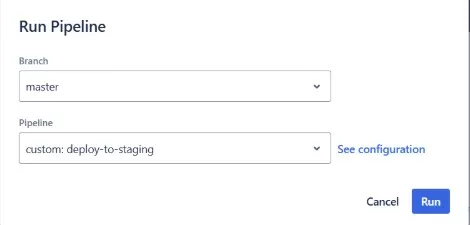
- Click Run
- Once the pipeline is done running, your changes should have deployed on the site
- Make sure to go to ACF and check if the sync button is available. If so, sync all changes. This will make sure that the acf-json changes are synced with the database.
How to Manually deploy changes via SFTP
If for whatever reason you are unable to run a pipeline or need to push some code to a site that doesn’t have a repo, follow the steps below. It’s a good idea to backup the remote site’s theme files before overwriting with your local ones.
- Follow the steps here to generate and add your SSH key to Forge (if this has not already been done) and to learn how to connect to a Forge server via SFTP.
- Note: If pushing code to a site we do not host, you will need to get the client’s SFTP information (host, user and password)
- Once connected, navigate to the truemarket theme folder.
- On your local machine, navigate to the project theme folder
- Select every file/folder, except
node_modules,.git, and.gitignore - You can do this with the
ctrl+ashortcut then holding ctrl+clicking on the individual files/folders - Right-click the local files you selected and click on upload:

- Note: If you only made CSS/JS changes, you could also just upload your assets folder instead of the entire theme every time. Though you should always include the
functions.phpfile to handle cache busting.
- Note: If you only made CSS/JS changes, you could also just upload your assets folder instead of the entire theme every time. Though you should always include the
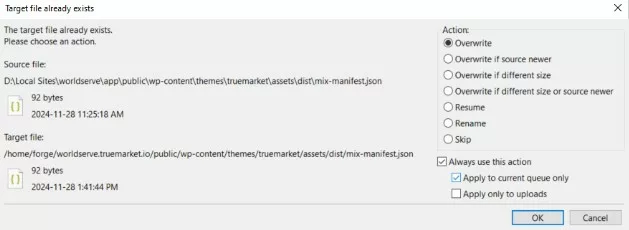
- Select Overwrite and check Apply to current queue only when prompted
- Open the remote site and make sure your changes came through without breaking anything.